Created: 08/02/05 by EF Updated: 03/31/15 by EF
When you see this ![]() icon, you can click on it to return to this point.
icon, you can click on it to return to this point.
Click 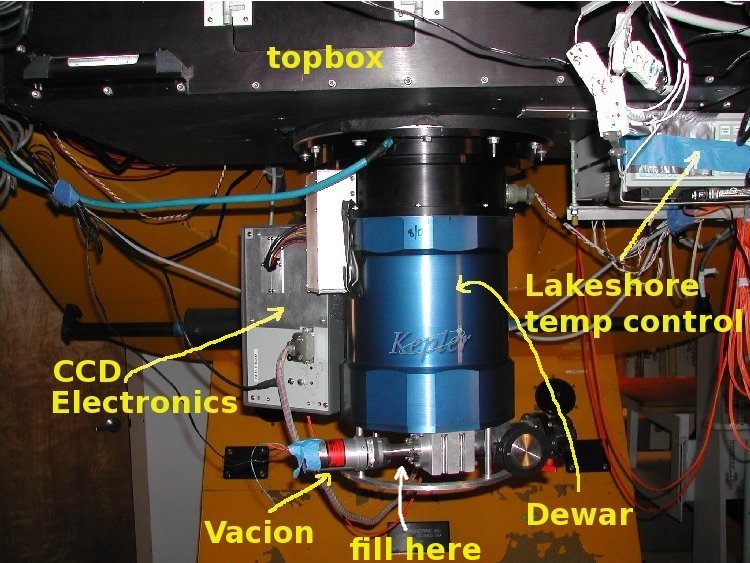 here or on the image to see labels.
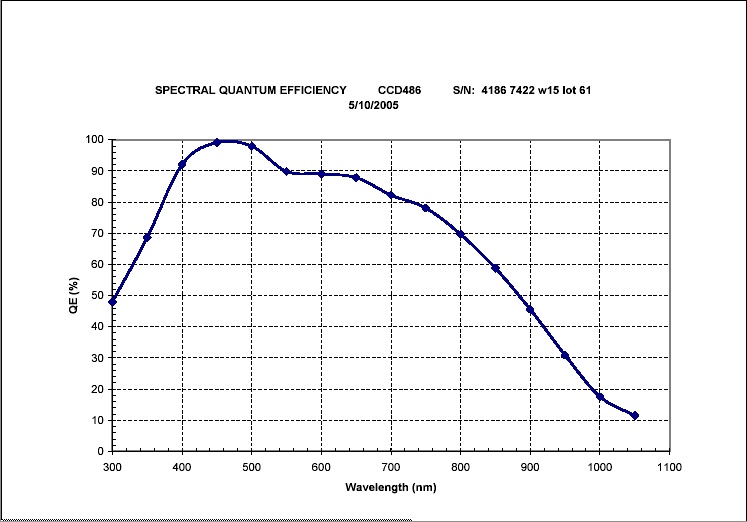
Click here for information on the Keplercam CCD Chip. For a (warm) QE curve, click here.
We keep the observer computer account unchanged, except for necessary updates. If you make minor changes in any observer directory, please advise us. The observer account is restored semi-periodically from a frozen disk version. If you don't like its setup, or wish to make lasting changes, please request your own account, but do not use it to observe.
We use a 3-button mouse with several functions. The location of the cursor driven by the mouse brings focus, i.e. directs keyboard characters to the appropriate window. You simply place the mouse cursor (looks like a capital I) on the window you want to work in. Often, if nothing happened after you typed a command, it was because the mouse was not in the right window. A simple action you can achieve is to click with the left button on a window just about anywhere on it, except on the little boxes at top right: that brings it to the foreground. Other actions, such as clicking, dragging to select, and inserting, are standard X. At the top margin of each window is a bar; clicking a mouse button there once results in one of these actions:
To start the Keplercam system, mouse the cursor over to the Main Login window and type
The Telshell window accepts all commands for system control of the CCD, telescope, filters and guider. It has the basic functions of tcsh (command line editing) as well as custom functions. It also has commands built-in to control the telescope, filter positions and guider functions, which duplicate many of the Ntcs GUI functions.
The CCD is controlled with command "ccd" to which you pass different parameters. You only need a few of these, and there are aliases for the most frequently-used ones (see Taking Data).
If you need to monitor the status of the CCD
start a vncviewer session to
the computer that controls the CCD, called kepccd. On
any xterm, type:
vncviewer kepccd.sao.arizona.edu:2
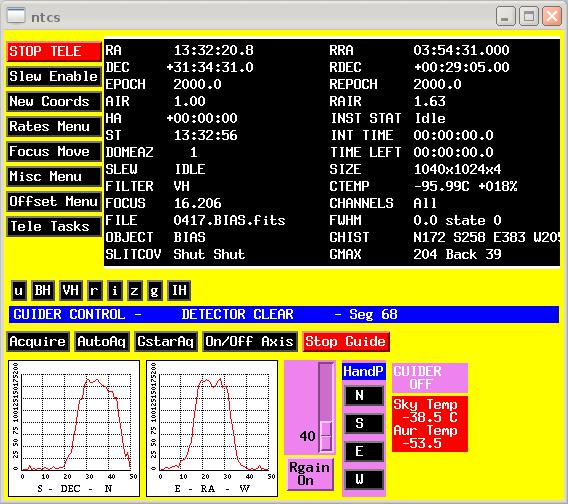
The CCD temperature
must always remain near -96.0C, as displayed in the ntcs window and
saved in all image headers.
Monitor the values in the
Ntcs window. If you notice the temperature differs from -96.0C by
about 2C or more, please contact staff as soon as possible.
The percentage displayed
next to the CCD temperature in the Ntcs window is
the running time of the heater on the Lakeshore controller. If it is pegged
at 0%, the heater is off. To check, read the heater setting on the
display of the Lakeshore
box attached to the topbox. If it shows it's off,
press the "Heater Range" button (top, left)
and use the arrows on the right to scroll to "Low," the normal setting,
then press "Enter" (bottom, right).
If the CCD warms up, you or the next observer may lose
a night because the CCD will need to be pumped and cooled, a process
of several hours.
If the CCD temperature is displayed as +999.0C
do not panic, this is an indication that communications between the CCD
computer and the Lakeshore controller have failed; please inform the staff
immediately! If you see a
view similar to the snapshot, the system is behaving properly; otherwise
you should restart the system, as described
here
.
The images are stored in a directory named /kep/yyyy.mmdd, for example /kep/2020.1221 for 2020 Dec 21. The directory changes and appears automatically at noon MST. About 3 months of data are kept on flwo48; older data are in the Keplercam archive in Cambridge. Data are stored as FITS EXTENSION files (see chip characteristics).
NOTICE: commands are executed sequentially, including all CCD operations such as exposures and readouts, and all telescope operations such as slewing, offsets and filter changes. This means that one cannot command the telescope to slew before a readout is finished, for example.
CCD commands may be called either interactively or from scripts.
See the example scripts in the Telshell
link for proper scripting syntax.
The following are the interactive Telshell commands available
(comment, object and setcom are exceptions that
confirm the rule: they may be called from scripts):

Here is a sample TCS window, captured while idling:
We have 4-inch UBVRI, Sloan and narrow-band filters. Note that our 2-inch filters vignette at the edges of the CCD field, in a curious way that causes astigmatic star images. NOT recommended with Keplercam, not used for years.
For instructions on how to measure and set the focus with Keplercam, please follow this link.
To measure and set the focus, use the kfindfwhm script. It is fully automatic, estimates the focus, sets it, estimates the seeing, and records its results along with mirror temperatures to a file we use to monitor the seeing.
The telescope focus changes with outside air temperature in a predictable way (more at the seeing link). After slewing to extreme hour angles, the focus may also change. If you see unusual changes in focus values, please report that in detail, in the nightly logs.
You may also use the ancient, manual style of focusing the telescope, as we describe here.
It is not easy to kill a script, for the shell is occupied during the
script and will not accept commands like "kill". Typing CNTRL-C during
readout will sometimes kill each exposure individually, and thus is
useful if there are only a few exposures left. Otherwise, you must kill
the Telshell window (using the 3rd mouse button to bring up "Destroy
Window"), and then restart the Realtime system. This problem may be avoided
by putting in 5 second delays between each sequenced exposure in the
script used, during which
time one can type a CNTRL-C which will kill the sequence.
![]() To Table Of Contents
To Table Of Contents
Filesystem           1K-blocks      Used Available Use% Mounted on
kepccd:/data         307663800 166030328 126005040  57% /rdata
and note the space available on the data disk, about 120 gigabytes in this example.
The Iraf command to delete FITS files is imdelete. You may wish to edit the parameter file for imdelete (epar imdelete) to turn on its safety measures against accidental deletion.
You can also use delete or rm for most files including FITS files, and unix rmdir for directories. Your data will be subject to deletion the afternoon following your last night of observing. However, if there is ample space to start your run, you might request postponing such deletion until it becomes absolutely necessary (especially on weekends). You may want to check the data disk to see what volume of data may be left over from the previous observer.
After exiting Realtime system, you can exit the computer by pulling up selecting Logout from the windows manager menu in the toolbar at the bottom.
First, however, if INST STAT in the Ntcs GUI says "Partial" and nothing else happens but you still have a response in the Telshell, try typing "dstore" there, which may complete the stuck readout and clear the problem.
If that fails or the problem is different,
you do need to take the following steps to restart the CCD:
vncviewer kepccd.sao.arizona.edu:2You will be prompted for a password (same as for observer). A window like this snapshot will appear on your screen. If you see something similar to this view, the system is behaving properly, otherwise proceed with the steps below.
redoThe CCD system will be shutoff and restarted. Watch the Foid window for activity. Things are done after the test Bias reads out.
If you wish binning other than x2 then you MUST enter a command to change the binning after a redo from the Telshell window.
If the Telshell window on flwo48 echoes gobbledygook when you type something sensible, the cause is likely to be an attempt to stop a script while it is still exposing by typing CONTROL-C at least once. Another possibility is that tcs just becomes unresponsive on flwo48. Click here for instructions to recover from either event.
If you get into bad trouble, for example the complete screen locks up on you and you get no response for several minutes, you will have to reboot the system. You may also have to do this to restart after being shutdown because of maintenance work or power problems.
There are two possible ways to reboot:
Within a few minutes, after a lot of messages, the login window should be back.
  ls -l[dirname]    (dir)   - lists the contents of a directory
  rm file          (del)   - deletes file
  mv file1 file2             - renames file1 to file2
  cp file1 file2              - copies file1 into file2
  cat file                  - lists the contents of a file
  xpp filename              - prints file named filename
  xterm &                 - creates another window
  vi[filename]             - an editor
  emacs[filename]          - another editor
  cd directory             - change to directory directory
  mail                   - To read your mail
  mail name[@host.domain]  - To send mail to user
  ssh [user@hostname]        - Connect securely to hostname
  sftp [user@hostname]     - secure file transfer program
It is wise to not use the login window for remote logins or transfers via ssh or sftp.
Once you have taken an image, move over to the IRAF window to look at the data. In that window, type cd; ecl as usual. You will need to cd to the data directory, for example cd /kep/2020.0101. Type dimtool for ds9, *the preferred display method*, simtool or ximtool, then type flwo48:0 at the IRAF prompt to display on the monitor. If you are displaying unbinned images, you may need to change the stdimage in IRAF if you have changed the default at login: type set stdimage=imt2048 to view your full images.
If you want to use the left monitor to display images, there are a few tricks. To use saoimage (ds9), type simtool (dimtool) as above, but type flwo48:0 to the IRAF prompt. This will place the saoimage (ds9) window on the left monitor. To use ximtool, you must find an xterm in the left monitor (to open an xterm, move the cursor there, and click on the left button). Start up IRAF, type ximtool, and answer flwo48:0 to the prompt. You can now display images from either that IRAF window, or one on the right monitor.
You may use mscdisplay (in the mscred package) to display images, e.g., type "mscdispl 0004.M31 1." You must first start ds9 or equivalent from the IRAF prompt, as above. The task mscexamine supposedly allows one to examine them (like imexamine but for mosaics). Unfortunately, mscexamine appears to be unreliable: it reports wild x,y pixel coordinates and erratically dies with the message "ERROR: invalid floating point operation." Another approach is to use imexamine on individual frames (see below for an example). If you use ds9 you also have the option of loading the array directly into it (use "File" menu, then "Open Other" then "Open Mosaic IRAF..."), imexamine will work on the full array. Make sure you have set stdimage=imt2048 (the default). Note: this all works only if you have started up ds9 from IRAF, not standalone.
Other mosaic commands can be found in the package "mscred" (loaded at startup). Warning. A "feature" of mscred is that pixel coordinates are always displayed in detector units, in this case one unbinned pixel. Thus, if you take binned data, and use mscdisplay or mscexamine, the pixel values shown in your imtool (ds9, saoimage, ximtool) and in your fwhm from radial profile fits will seem to be twice as big as they actually are. Note: in ds9, the WCS values are absent when the images are displayed from IRAF. To avoid this annoyance and those above, you should load your images directly from ds9, as described above. Single frames can be displayed thus: "display 0001.M31[1] 1", for example. This method is sometimes more useful since the pixel coordinates displayed do reflect reality. Many other commands can be executed on these files by using the image extension value [1]-[4].
Help can be found in the TDC web page in its "Data Analysis Software" section. Click on saoimage's Color menu button and you will enable the lookup table, altered by holding a mouse key down and then moving the mouse. The most useful iraf packages for analyzing your image are imexamine or mscexamine which place a cross shaped cursor on the image, allowing line and column plots (l or c keys), and radial profile plots of stars (r key). These graphs will come up in a separate graphics window. Use q to exit imexamine. The implot package also comes in handy.
If for some reason another saoimage, ds9 or ximtool is still running, IRAF will not display in the new one. If you suspect this has occurred, as evidenced by display not doing anything, go to the main login window and type ps auxw |grep -i saoimage, ps auxw |grep -i ximtool or ps auxw |grep -i ds9. Kill any processes named saoimage, ds9 or ximtool with command kill -9 procnumber, then try simtool, dimtool or ximtool again. If it won't let you kill them (not owner), use godown to reboot.
Hardcopies can be printed by going to the etc menu, and clicking on print.
It is best to perform the necessary debiasing and flatfielding of the Keplercam data with IRAF. You should use tasks in the IRAF package mscred. Within IRAF, type "help mscred" and "help mscguide" for detailed instructions on the tasks you'll need to master.
The data archive of Kepler images is located on CF machines at /data/kepler/Archive/rawdata/kepcam. For further information about the archive please contact Bill Wyatt at CFA.
Once you've settled in your office with a nice thermos of piping hot water for your mate, inside IRAF you should type a sequence like this one:
cl> cd your.data.directory
cl> mscred
mscred> zerocombine *BIAS.fits
mscred> flatcombine *FLAT*.fits
mscred> ccdproc *your.object*.fits
Some examples of parameter values for the 3 tasks to use for reductions are here. You may need to tweak some of these for your version of IRAF.
Once you have reduced your data, you will undoubtedly wish to analyze it.
A complete discussion is beyond the scope of this document, but you
may find the following items useful: