For directions to start/stop guiding, visit
TCS.
Visit segment
for a description of the layout and properties of the guider segments.
This PC is on at all times. It does not need to be shut off during a lightning storm. Coverage of this computer will begin with a discussion of how to log in, what to startup, and how to shut it down (just in case!).
If you need to log in, you will see the Login Window centered in the screen. The account name is guider, the passwd is as for the observer account on flwo48, and is posted in the control room. Type guider in the Login: line, and enter the passwd on the Password: line. You can hit enter here, or select Go! to login. This will start up the Xfce window manager. It has a Control Panel to the right of the screen. On the right side of the screen is an Icon named "Guider". Click this once to start the Video Processor, and Guider applications.
You should not need to logout, since this will require restarting the Realtime system. However, if you find a need to logout, first exit the Realtime system. Then click the "Quit" button on the vidDisp window. This kills the tacquire and vidDisp sections of the software. Next, move the mouse outside of any window, right click, and a menu will appear. Select the last entry, Logout. It asks if you wish to restore, which is fine to do. This will end the rguide program.
To shutdown the machine you must be on the console, not using vnc! First exit the Realtime system, then click the Quit button in the vidDisp window, and enter a Cntrl-C in the rguide window, and then logout. From the "Welcome to guide48" greeter screen, click the second round icon at the bottom of the window. This pulls up a menu, select the last choice, Shutdown. This will pop up a window where you can choose to Turn off the computer or Restart the computer. If you turn it off you will need to push the power on button at the bottom center front of the guide computer to start it again.
To restart the PC, power up and wait until the reboot is finished, or just the latter if you did not power cycle. Then follow the instructions above to login and start the guider software. Wait until the window on guide48 says "Motors Positioned, you can start Realtime system on flwo48," which will appear after a series of messages indicating the topbox motors are homed. Once you reach that point, go ahead and restart the Realtime system on flwo48.
When you click the "Start Guider" button, three programs start. You will only see two. The main program is called vidDisp, and is the display process for the Video Processing part of the software. It presents the only controls you will normally need on this computer. The other two programs are tacquire, which performs the actual Video processing and interfaces with the frame grabber device driver, and rguide, which controls the topbox motors, and the actual guiding functions and hand paddle interface. Rguide error output is shown in a xterm window, please do not fiddle with this window. Tacquire has no visible interface. More on each program follows.
These two programs work together. All you see is vidDisp. It has controls that influence tacquire. Tacquire also shares the video image with rguide.
This program provides real time frame rate video processing of the camera signal from the guide camera for Keplercam. It provides an interface with a lower level device driver that reads from a DT3155 PCI framegrabber. This program has no direct user interface. It is commanded via shared memory from the vidDisp and rguide programs.
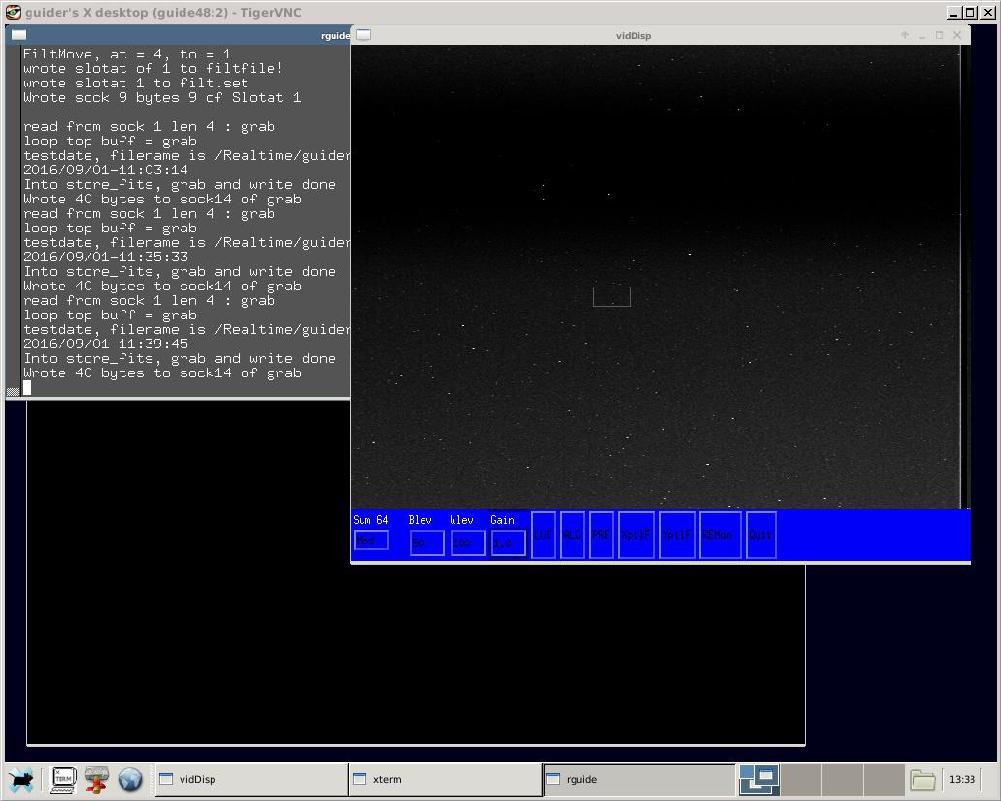
VidDisp is the display program and user interface for the video processing that is used to replace our old composite monitor. It presents a window as shown here.
The large top section of this program displays the current processed image. The light gray box is a marker the can be moved as desired. You can move this box by right clicking the mouse in the image window. This will center the box where you clicked.
At the bottom are a series of controls. These controls are the user interface for vidDisp and tacquire. From the left there is a widget to click to change the number of frames summed. These frames are displayed at a rate of 30 frames per second. Clicking the change widget gives a list of possible summing numbers. Down Arrow here will decrease this value. The possible values are 1,2,4,8,16, 32,64, and 128 ONLY. Click the one you want. Summing 32 frames can take more than 1 second to average the frames. Summing 128 takes 4.4 seconds. This function reduces the displayed image noise.
Next there are a series of Input boxes. You can place the cursor in these boxes, replace the values with a new value, and hit return. The new value will be applied. The first one is Blev. This parameter represents the black threshold for most of the image algorithms. It should be set to a value just below the background value. It has a default value of 30, which generally works well. Next is Wlev, which will clip the maximum white level. Values above this value are clamped to this value in some algorithms.
The next one is Gain. Gain currently is used only with the Contrast-Stretch and Linear Gain algorithms, mentioned later. When using other algorithms it is fixed at 1. For the stretch algorithm this is a multiplicative gain of the input signal. If the gain is set to 1.5, a pixel value of 20 is displayed as 30. Values less than 1.0 will decrease the displayed value.
Blev and Wlev can also be adjusted by clicking with the middle mouse button and holding, moving and then releasing the button. Movements left-right adjust Wlev, and movements down-up adjust Blev.
Next is LUT, which shows the current Lookup Table when clicked. Hit the Cancel button to make this display disappear.

Next is the ALG button, which allows selection from one of four processing algorithms. Select from:
Linear Gain, which multiplies the input value by the gain setting.
Contrast Stretch, which clips the input values between Bval and Wval, then multiplies the value by gain.
Parabola, which multiplies input values by a parabolic function (see LUT).
Square Root, for input value t1, the displayed value is sqrt((ti - bval) / (wval - bval)), after clipping between Blev and Wlev.
Log, which takes log10 of input values, and clips between Blev and Wlev.
Next is the PRE button, which allows selection from two setups, which set all values to values determined from testing, namely CCD Dark, and CCD Light. These refer to sky conditions, so use Light if the moon is up. It is expected that new users will most often use the PRE button to fit the current telescope conditions.
The next two buttons flip the image left/right or top/bottom. Next is the button for Remote use, which shows its current state. It shows REMoff to update the displayed image at a rate of 30 frames per second, or REMon which is used during remote observing or with Rob. This will only update the image once each second. See below for instructions for remote observing. Next and finally, comes the Quit button, which stops vidDisp and tacquire.
This program controls the autoguider algorithm, the topbox motors, and the hand paddle interface. Its error output is displayed in an xterm window. The tacquire program displays images, and the TCS Program contains all controls for this program.
If this attempt fails, it means that a vncserver is not running and must be started on guide48. To do that, ssh into guide48 as user guider, with the same password as observer. Then issue the command "govnc". This will start an appropriate vncserver. Exit the ssh session.
Next, connect to the guide computer with vncviewer as above. You should see a window with an xterm and an icon that is labeled "Guider". Click this once, and the vidDisp window will appear. The first thing you should do at this point is click the REM button so it shows REMon. This setting slows down the display of summed frames to a rate of one per second. Then you can adjust any other items you desire.